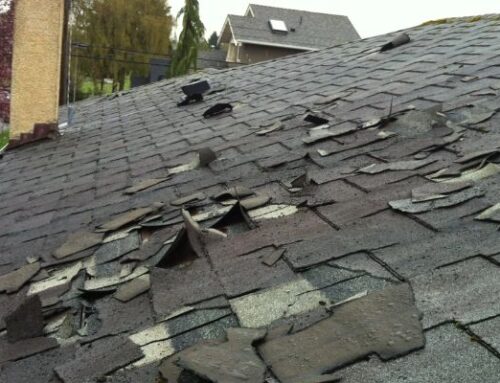
When severe weather attacks, the effect on residential and commercial properties can be deeper, especially when it comes to the roof – the first line of defense against elements of nature. A storm can compromise the roofs, resulting in leaks, structural damage and potential dangers that can proceed when not addressed immediately.
In “The Complete Guide to Post-Storm Roof Restoration”, we will navigate the stages and ideas required to effectively assess and restore the roofs after a storm. The purpose of this comprehensive resource is to identify damage to homeowners, property managers and restore professionals, to understand repair options and to implement restoration strategies that ensure longevity and safety of roofs.
From initial inspection and damage evaluation to selecting qualified contractors and understanding insurance claims, this guide offers a wide roadmap for a successful restoration process. Whether to deal with minor shingle damage or significant structural issues, it is important for the recovery of post-duo with diligence and expertise.
By following the principles mentioned in this guide, the readers will not only restore their roofs, but will also achieve peace of mind, knowing that their property is once again safe against future storms.
After a severe storm rolls through, your roof becomes the frontline defender of your home. Having helped hundreds of homeowners navigate insurance claims and repairs, I’ve learned that timely, informed action makes all the difference. Here’s your step-by-step playbook for restoring your roof safely and effectively.
#1 Step
1: Safety First – Assessing Damage Without Risk
Do:
- Use binoculars from the ground to scan for missing shingles or dents.
- Check attic spaces with a flashlight (look for daylight peeking through or water stains).
- Photograph damage from multiple angles before making temporary repairs.
Don’t:
- Climb onto the roof immediately after a storm (wet surfaces are dangerously slick).
- Ignore downed power lines near roofing debris.
- Pull off dangling shingles (this can worsen exposed areas).
Pro Tip: Keep a pair of knee-high rubber boots handy – they’ll protect you when walking through debris-filled yards.
Step 2: Documenting Damage for Insurance
What Your Adjuster Needs to See:
- Close-ups of granule loss in gutters (shows hail impact)
- Time Stamped photos of interior leaks
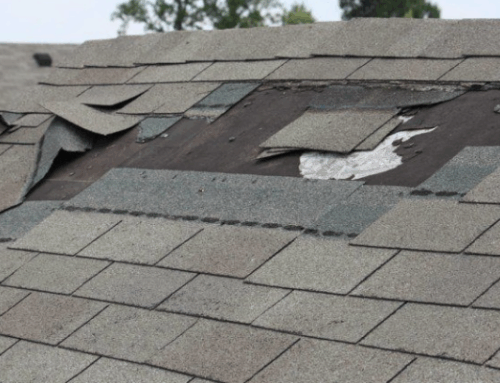
- Shingle creases or cracks (indicate wind lift)
- Flashing separation at chimneys or vents
Common Mistakes to Avoid:
- Cleaning up debris before photographing
- Making permanent repairs before the adjuster’s visit
- Accepting the first assessment without a roofer’s consultation
Step 3: Temporary Protection Measures
Emergency Materials to Keep On Hand:
- Heavy-duty tarps (6mm thickness) with sandbag weights.
- Roofing cement for sealing minor flashing lifts.
- Plywood sheets for covering larger holes.
When to Call for Professional Tarping:
- If damage exceeds 3-4 missing shingles
- When roof slopes are steeper than 6:12 pitch
- If you see sagging roof decking
Warning: Blue tarps from hardware stores often fail within weeks – invest in reinforced, UV-resistant covers.
Step 4: Choosing the Right Repair Approach
Partial Repair vs. Full Replacement:
Isolated wind damage (under 10% of roof)- Spot repairs with matching materials- 300−$1,200 approx
Widespread- hail damage (granule loss + bruises) -Full replacement recommended- $8,000−$25,000 approx
Multiple leaks with decking rot – Structural repairs + new roof -$15,000−$40,000 approx
Material-Specific Considerations:
- Asphalt Shingles: Look for “bruising” – dark spots where hail knocked off granules.
- Metal Roofs: Check for dented seams that compromise watertightness.
- Tile Roofs: Cracked tiles often require complete replacement (they’re brittle when walked on).
Step 5: Selecting a Restoration Contractor
Vetting Checklist:
- Storm-chaser red flags (out-of-state plates, PO box addresses)
- Manufacturer certifications (GAF Master Elite, CertainTeed SELECT)
- Local references from post-storm jobs
- Detailed written estimates (not vague “per square” pricing)
Contract Must-Haves:
- Start/completion dates
- Debris removal specifics
- Warranty transferability
- Lien waiver upon payment
Step 6: Navigating Insurance Claims
Maximize Your Settlement:
- Request a copy of the adjuster’s “line item estimate”
- Require matching shingles if your roof is under 10 years old
- Appeal denials with independent engineer reports
Watch for These Lowball Tactics:
Depreciating labor costs
Excluding necessary underlayment
Ignoring local building code upgrades
Step 7: Preventing Future Storm Damage
Upgrade Options Worth Considering:
- Impact-resistant shingles (Class 4 rated)
- Ice/water shield entire roof (not just edges)
- Hurricane clips for roof-to-wall connections
- Gutter guards to prevent debris buildup
Maintenance Habits That Pay Off:
- Trim overhanging branches annually
- Reseal flashings every 3-5 years
- Clean gutters bi-annually (especially before fall)
Step 8: Understanding Hidden Structural Damage
After major storms, what you don’t see can be more dangerous than visible roof damage:
Signs of Concealed Issues:
- Attic Mustiness: Lingering damp smells indicate trapped moisture
- Ceiling Cracks: Spiderweb patterns suggest shifting roof decking
- Nail Pops: Protruding nails in drywall signal framing movement
Diagnostic Tools Pros Use:
- Moisture meters (detect wet insulation behind walls)
- Thermal cameras (reveal compromised insulation areas)
- Endoscopes (inspect inside wall cavities)
Step 10: Landscaping & Exterior Protection
Your restored roof needs defended surroundings:
Storm-Proofing Checklist:
- Tree Management: Crown thin oaks/maples to reduce wind resistance
- Debris Barriers: Install gutter screens after roof work (prevents clogging from repair debris)
- Ground Grading: Ensure 6″ slope per 10′ away from the foundation
Cost-Saving Combo Projects:
- Time siding repairs with roof work for shared labor savings
- Install snow guards when replacing winter-damaged sections
- Add radiant barrier underlayment during summer restorations
Step 11: Post-Restoration Monitoring
First Year Critical Checks:
- After 3 Months: Re-torque all fasteners (temperature changes loosen screws)
- First Heavy Rain: Inspect attic with flashlight for new leaks
- Seasonal: Check for shingle “telegraphing” (visible decking waves)
Warranty Activation Steps:
- Submit contractor’s completion certificate
- Mail sample shingles for material verification
- Schedule manufacturer’s inspection (often free)
Red Flag: Warranties void if gutters aren’t cleaned annually – mark your calendar!
Step 12: Creating a Storm Response Plan
Build Your Preparedness Kit:
- Emergency Contacts: Roofer, adjuster, and contractor numbers in waterproof pouch
- Supplies: Roofing nails, spare shingles (from original install), and elastomeric caulk
- Documents: Laminated roof blueprint with material specs
Practice Drills:
Tarp deployment on ground structures first
Power outage protocols (charging flashlights/drones)
Family meeting points if the roof collapses
Real-World Lesson: A Texas family saved $9,000 in secondary damage by pre-staging sandbags around their AC unit before hail hit.
Final Considerations
When to Consult Specialists:
Structural Engineers: ($300−$500) if rafters show deflection
Forensic Meteorologists: ($1,200+) for disputed hail claims
Public Adjusters: (10-20% of claim) for complex multi-storm damage
Community Resources:
FEMA Disaster Declarations (unlocks low-interest loans)
Local roofing co-ops (bulk material discounts)
Utility company rebates for impact-resistant upgrades
Remember: The best restoration makes your roof stronger than pre-storm conditions. Insist on meeting current building codes, not just matching old materials.
When Restoration Isn’t Enough
Consider replacement if:
- Your roof is within 5 years of its lifespan
- Multiple storms have caused layered damage
- Energy bills are rising due to compromised insulation
Final Advice: Keep a laminated copy of your roof’s warranty and material specs in your home file – you’ll need it after every major weather event.
Conclusion:
Recovering from storm damage isn’t just about repairs—it’s an opportunity to fortify your home against future disasters. By following this 12-step roadmap, you’ve learned how to: spot hidden dangers that untrained eyes miss, maximize insurance benefits while avoiding costly mistakes, select materials and contractors that deliver lasting results, implement upgrades that reduce future risks
For homeowners who’ve weathered the worst, these lessons transform anxiety into empowerment. Your restored roof isn’t just a patch job—it’s a smarter shield for the years ahead.